There are different methods for OS X Installation. Starting with the patched DVD releases like the famous iAtkos, Kalyway, iDeneb and others. The use of this DVD is very simple you just have to boot into the DVD, select the kexts(a kind of drivers for mac) and Install. If you are lucky enough I will run correctly the first time(very unlikely, I had to give it like 10 tries). Now a days this patched DVD work with almost any desktop and laptop. They have a series of limitations, i recommend you to check the projects Wiki to make sure that your hardware is compatible with Mac OS X Leopard.
Well lets get Started

What you need:
- Compatible PC or Laptop
- Any Patched Leopard DVD. You can fin them any torrent site.
- Mac OS X Leopard Retail ISO. You can also find it on any torrent site.
- The latest Mac OS X ComboUpdate. At the moment the last one is 10.5.6. Yo can download it directly from Apple. Click here to download.
- This Basic Kext package. Click here to download.
- The UIInstaller Application. Click here to download.
- And a little bit of patience.
Step 1: Installing from patched DVD.
Insert the patched DVD and boot from it. Wait for it to load and go to Tool->Disk Utility. In disk Utility you will prepare the partitions for the retail installation. I recommend you to create 3 partitions; One for Data, one for the retail installation and the last one for this auxiliary process. Remember to use Guid partition table and HSF+ Journaled format for the partitions. then proceed to the installation process. Remember to select the correct install destination. Also remember to install using the appropriate kexts.
After the installation process is completed your Pc will automatically reboot and should boot into Mac OS X Leopard. You may notice that a form appears after the video, fill it to create your user and password for logging in.
Step 2: Preparing and installing your Leopard Retail Installation.
Mount your Mac OS Retail Iso image. Then open a terminal window and type:
sudo -s
cd /volumes/Mac\ OS\ X\ Install\ DVD/System/Packages
open osinstall.mpkg
Then an installer window will pop out.
Be sure to select the correct destination for the installation.
You can Customize your installation. Personally I like to remove the additional languages and the printer drivers for optimizing space on my disk, but that's completely up to you.
After the installation process is completed mount the ComboUpdate package you previously downloaded and run it. Remember do not reboot your computer.
Step 3: Installing EFI and replacing the incompatible kexts.
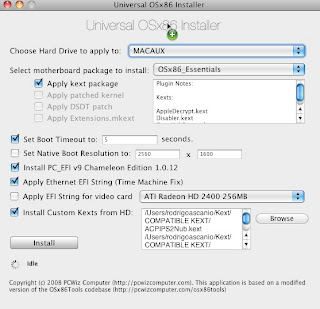
Open the UInstaller application. Check items you see on the picture and browse to select all the kexts you downloaded plus the kexts you need for you hardware.

Once you have done this just click on install.
Now you can reboot. Using this method you will automatically boot into the Leopard retail installation partition.
Hope this information is useful for you all!
Regards!
Rodrigo
hey there! was wondering if you got any of the fixes yet? i'm planning on doing the same setup to same hp notebook! please let me know :)
ReplyDeletespacevolt at yahoo dot com
Well i must say that many of the problem have been fixed expect for the web cam and the Wifi, which is very annoying but otherwise the system works great no crashes no blue screens and it is very fast.
ReplyDeletethe guy developing the Wifi driver expects that it will be fisnished by the end of this month. With this i will finally get rid of vista! ;)
Regards!
Rodrigo
Excellent! very useful and I will try!
ReplyDeleteitriago_net